Wednesday, May 29, 2013

Doll Making 101

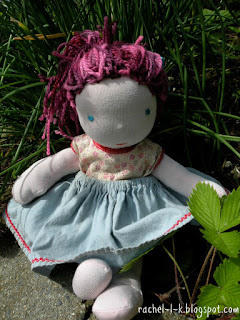
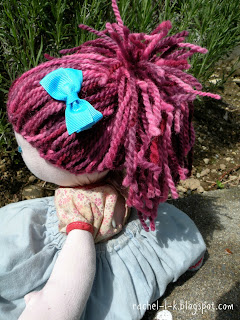
I made my first Waldorf doll last week, she turned out so nice!  I found the best tutorial for making the head and body, for the nose I used this tutorial, and based the hair on this tutorial. I had everything I needed in my stash, except for the fabric for the outside body.  I used an organic bamboo spandex blend.  It was quite thin so you can kind of see through it, next time I will try two layers.  I made the pattern by looking at the picture in the body tutorial.  The doll is stuffed with wool and a wool/mohair blend.  I was originally going to use the yarn for the hair for a teapot cozy but I always wanted to make a doll with colorful hair! 

Next doll I'll do my own step by step picture tutorial.  I had to fill in a few blanks from the picture tutorial but for the most part it was really simple to follow along.


M snuggling with the doll head


luckily I had some vintage doll clothes that fit perfect!


Monday, May 20, 2013

DIY Baby Blanket


Do you know anyone having a baby this summer?  If you do, this is the perfect gift to make and give to a sweet summer babe. These lightweight blankets are 100% cotton stamped with fabric paint.  They will keep a baby cozy but nice and cool during the hot months.

You will Need:

-1 meter of lightweight  cotton fabric per blanket (mine is from Royal Fashions in Abbotsford, $2/meter!)

-some sort of fabric printing paint, either for block printing or screen printing, I have both Permaset and Speedball

-a stamp, either hand carved or store bought

-small paint brush

-a small piece of foam


This is for the Anchor blanket.  Blue fabric paint, and a $1.50 stamp from Michaels


Red + white = pink!  Hand carved bow stamp


 Use your paint brush to paint a small area of the foam with the paint.  You will have to go over it a few times.  This is basically like making your own ink pad, but instead of paper ink its for fabric!

 Make sure the area is big enough to fit the stamp

 When you stamp the paint with your stamp, make sure it covers the whole design.  You might want to test it on some other fabric to make sure it has the coverage you want.  I had to dab mine numerous times to get a consistent coat.
 Start on the left top corner and work down in rows moving towards the right.

The pattern I made ended up being about 5" apart in every direction.  It fit perfect on 1 meter of fabric.  You could also do a random design.

Once you have printed it all, follow the instuctions on your jar of fabric paint for setting the paint.  I hemmed my blankets up with a serger edge and a 1 cm folded edge, then threw it in the dryer on a hot setting for 5 minutes.  If you were to wash the blanket without heat setting the paint, it would all wash off.  So don't forget!

Make a couple more! Keep one and give one away!


The fish was also a hand carved stamp, have fun with different shapes and colors too!
Wednesday, May 15, 2013

Shifting Focus

After about 3 days of beautiful weather, everyday spent outside in my back yard with a toddler and a 4' dangerous retaining wall drop off, my husband and I decided it was time to build a fence for safety. On Sunday (May 5th) we went and got building supplies.  I was determined not to "waste" a whole weekend building an 80 foot long fence I got to work during my precious alone time (baby napping time).  I started on Monday, digging, transplanting shrubs out of the fence line and preparing holes for the posts.  So during baby naps all last week, and in the evenings after baby bed time we managed to finish by Friday night with some help from family members too!  Goal accomplished! No fence building on the weekend, just relaxing, and celebrating birthdays and Mother's day!

Phew!


I had an idea for a flower box made out of burlap, it seems to walk a fine line between tacky and awesome.


In other news, I joined a Roller Derby class at my local leisure center.  My sister-in-law joined too.  I am on a mission to make awesome clothing for it.  Designing could be fun!  Not my normal design astetic, but sometimes we need something a bit CRAZY in out lives!

Here is some fabric that is Inspiring me today;

Ruffle fabric the neon is my favorite!

Stretch lace these would make killer tights

Stars shorts out of these anyone?


Wednesday, May 1, 2013

Today's Goals

I spent yesterday sewing up some narwhal softies that I designed, and my goal for the day is getting them on etsy!  Every once in a while I like to freshen up my shop and add new products to it.  Narwhals are such an interesting creature and these softies would be great for decoration or for play!  These would look pretty cute in a children nursery!

This guy is ready to celebrate your birthday with you and comes with his own party hat!


Did you know I'm getting into soft toy designing?  I took a step back from life last Tuesday and spent some time at a local tea shop thinking about what I like to do and what makes me happy.  The end answer after some sketching, thinking and delicious tea and tarts was soft toy design.  So with new ideas, and exciting new resources, I'm proud to call myself a soft toy designer!  This also means I'm going to try my hand at kids drawings turned into custom toys.  If you have ever thought about preserving your child's drawing in the form of a plush toy contact me for more details!
Related Posts Plugin for WordPress, Blogger...